Blur the background of an Image
In the last tutorial, we have discussed about the Threshold effect an wood imprinting type of edit which paves us way to edit an image in a classy way and also we can print the edited image on any type of things like mugs, T-shirts etc. Okay, now let's move on to this tutorial. In this tutorial, we will discuss about how to blur the background of an image. Here, we will show you a simple way to blur the background of an image. The technique is discussed below in step-by-step and the final result is shown in the below image.

Step 1: Double click on the Adobe photoshop 7.0 icon and open the software. It looks like as shown in the below screenshot.


Here, I have selected brush size-50, Mode- Normal, Strength-100% and unchecked the box. We will discuss about the other options in the above screenshot in coming tutorials. Now, It looks like in the screenshot shown below.

So, if you observe keenly the background of the image is more blurred than the original one and also while blurring the background increase or decrease the brush size in accordance to the curves of the image.
Step 4: Now, save the image by clicking on the "File" option in "Menu" bar and then click on "save" option and save your result in your desired folder. The final result is shown in the below image.

Step 1: Double click on the Adobe photoshop 7.0 icon and open the software. It looks like as shown in the below screenshot.
Step 2: Now open the image on which you would like to apply the edit by clicking on the "File" option in the Menu bar and then select "Open" option or simply you can apply the shortcut (Ctrl+O) for Windows OS.
Step 3: After opening the image, go to "Tools" bar and select the "Blur" option, it is shown in the screenshot below.
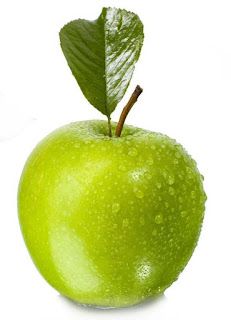
For this tutorial, I used this below image as an example.
Open the above image in Adobe photoshop 7.0 software by clicking "Ctrl+O" shortcut.
It looks like in the screenshot shown above.
In the "Tools" panel select the "Blur" option as indicated in the below screenshot.
Step 3: After selecting the blur tool, you can increase or decrease the brush size by pressing keys '[-to decrease', ']- to increase'. You can also increase or decrease brush size by selecting with cursor and you can also change mode, brush strength as shown in the below screenshot.
Here, I have selected brush size-50, Mode- Normal, Strength-100% and unchecked the box. We will discuss about the other options in the above screenshot in coming tutorials. Now, It looks like in the screenshot shown below.
So, if you observe keenly the background of the image is more blurred than the original one and also while blurring the background increase or decrease the brush size in accordance to the curves of the image.
Step 4: Now, save the image by clicking on the "File" option in "Menu" bar and then click on "save" option and save your result in your desired folder. The final result is shown in the below image.
Finally, the blurred image looks like the above image. This is the simple technique of blurring the background of an image. We will discuss about the other options and another type of edits that are resulted by changing the Mode, Strength etc in the coming tutorials. This is a basic and simple technique to blur an image. For any queries, feel free to share with us.


Comments
Post a Comment