Pixel explosion effect
In the last tutorial we have discussed about the Coloured pencil sketch effect . Now let's move on to a new high class effect called "Pixel explosion effect" in this tutorial. First, let me tell something about the effect. This is an effect in which the Picture is pixelated and made in very creative ways like falling, blowing etc. This effect can be done by using different types of brushes. We will learn about that type of effect step-by-step as follows...
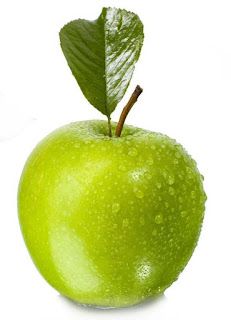
Before going to the process, let me show you the example image for applying the effect. It is shown below..

For editing purpose I have changed the background of the above image.
Step 1: Open the above image in Adobe photoshop 7.0 by clicking "Ctrl+O".

Step 2: "Select" the object of the above image which I have already discussed in the previous tutorials and "Paste" it in the new layer as shown in the below screen shot.


Step 3: Duplicate the "Layer 1".
To do that right-click on the layer 1 and select duplicate layer.

Step 4: Now, transform the underneath layer i.e.,"Layer 1" which i have already discussed in previous tutorials. But one should note that to not touch the top layer while applying this type of effect. You "Transform" only the underneath layers of the top most layer as shown in the below screen shot.

After doing that click "tick" mark on the right side top most corner.
Step 5: In this step i would like to cover body that is visible in the transformed layer by covering it with black portion selected with in the image and put it on the visible part.
To do that, I'm using "Polygonal lasso tool" and select any part in the image and put it on the visible hand part. So that the effect applied will look somewhat better.
If you wish you can leave that and apply the effect it's up to you. Okay..let's see what i have did in the below screen shot.

After moving the selected part it looks like the below screen shot.

Step 6: Now link and merge the layers i.e., "Layer 1 and layer 2" as shown in the below screen shot.

Step 7: After merging the layers, now apply "layer mask" to the merged layer as shown in the below screen shot.

Now select "Paint bucket tool" and fill layer mask with black colour then the image will disappear as shown below.

Step 8: Now, select "brush tool" and then choose "square" type brush and put "white colour" for it. After setting your brush properties just apply the strokes as you like as shown in the below screen shot.

The final result of the applied effect on the image is shown below.

Happy editing...!
Before going to the process, let me show you the example image for applying the effect. It is shown below..
For editing purpose I have changed the background of the above image.
Step 1: Open the above image in Adobe photoshop 7.0 by clicking "Ctrl+O".
Step 2: "Select" the object of the above image which I have already discussed in the previous tutorials and "Paste" it in the new layer as shown in the below screen shot.
pasting in a new layer 1920x1080 with 150 resolution.
Step 3: Duplicate the "Layer 1".
To do that right-click on the layer 1 and select duplicate layer.
Step 4: Now, transform the underneath layer i.e.,"Layer 1" which i have already discussed in previous tutorials. But one should note that to not touch the top layer while applying this type of effect. You "Transform" only the underneath layers of the top most layer as shown in the below screen shot.
Step 5: In this step i would like to cover body that is visible in the transformed layer by covering it with black portion selected with in the image and put it on the visible part.
To do that, I'm using "Polygonal lasso tool" and select any part in the image and put it on the visible hand part. So that the effect applied will look somewhat better.
If you wish you can leave that and apply the effect it's up to you. Okay..let's see what i have did in the below screen shot.
After moving the selected part it looks like the below screen shot.
Step 6: Now link and merge the layers i.e., "Layer 1 and layer 2" as shown in the below screen shot.
Step 7: After merging the layers, now apply "layer mask" to the merged layer as shown in the below screen shot.
Now select "Paint bucket tool" and fill layer mask with black colour then the image will disappear as shown below.
Step 8: Now, select "brush tool" and then choose "square" type brush and put "white colour" for it. After setting your brush properties just apply the strokes as you like as shown in the below screen shot.
The final result of the applied effect on the image is shown below.

Happy editing...!


Sup!
ReplyDeleteI couldn’t resist commenting. Exceptionally well written on adobe photoshop 7.0 download!
ReplyDeleteExcellent article it is. Thanks for sharing with us. We are Clipping Path Services Company. Recently we have post an article about Pixelated Image. Please check out. Thanks
ReplyDelete