Posts

Water Dispersion effect

Image
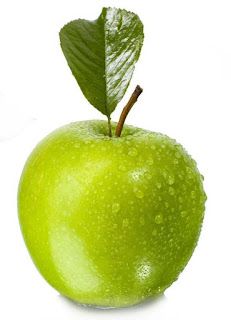
In the last tutorial, we had discussed about the Pixel explosion effect . It is also a type of effect in which you can apply more edits as i already stated "There are no limits for editing with photoshop".  Okay.. let's move on to next tutorial which is "Water dispersion effect" . Water Dispersion effect is similar to the Pixel explosion effect but the change is that there will be a very small and finest particles that disperse and it is applied to the image. As usual, let's discuss with an example.. My example image is given below.. Step 1: Open the above image in Adobe photoshop 7.0 by clicking "Ctrl+O" . Step 2: Use "Magic wand tool" and left-click one time on the white background in the  image and then invert the selection  by clicking "Shift+Ctrl+I" . Apply selection with "Magic Wand tool" . Inverted selection. Step 3: Now use "Drag & Move tool" to

Pixel explosion effect

Image
In the last tutorial we have discussed about the Coloured pencil sketch effect . Now let's move on to a new high class effect called "Pixel explosion effect" in this tutorial. First, let me tell something about the effect. This is an effect in which the Picture is pixelated and made in very creative ways like falling, blowing etc. This effect can be done by using different types of brushes. We will learn about that type of effect step-by-step as follows... Before going to the process, let me show you the example image for applying the effect. It is shown below.. For editing purpose I have changed the background of the above image. Step 1: Open the above image in Adobe photoshop 7.0 by clicking "Ctrl+O" . Step 2: "Select" the object of the above image which I have already discussed in the previous tutorials and "Paste" it in the new layer as shown in the below screen shot. pasting in a new layer 1920x1080 with 150

Coloured pencil effect

Image
In the last tutorial, we have discussed about the Inserting an image in text . It is a simple way and one of the type of edit done by most of the designers. I would like to tell you all that, there are no restrictions for editing in any type of editing you do. Based on your taste and your point of view, the pictures get new effects. I have already did a number of edits on so many number of pictures. Whenever, I finish the basic tutorials for you I will post you detailed description about my editing with applications. Stay tuned... Okay, Let's move on to the tutorial. In this tutorial, I'd like to tell about the Coloured Pencil effect which resembles like a drawing with colour pencils. Follow the below steps to complete the application of effect on an image. My example picture in this tutorial is shown below. Step 1: Open the picture in Adobe Photoshop 7.0 software. Step 2: Click on the background layer and unlock it. Then it appears as "layer 0"